A serial console allows you to see the boot logs even before the Linux kernel has started booting! Therefore, a serial console attached to your Raspberry Pi can help you find causes of problems like the following:
- A new Linux distribution that you flashed on your Raspberry Pi does not boot.
- Your Raspberry Pi boots into an older kernel even though you installed a newer kernel provided by your distribution maintainer via
apt/pacman/dnf. - You installed a new kernel using
apt/pacman/dnfbut now the Ethernet port does not work and you can’t SSH into it to uninstall that kernel. - Your Raspberry Pi does not boot at all.
- You are learning kernel development and want to see why the change that you made is preventing the kernel from booting.
- You have so many Raspberry Pis that you have run out of displays to connect to and just want to watch the boot logs to sanity check if they are booting correctly or not.
💡
Though the above bulletin mentions the Raspberry Pi in particular, this can be done for any other Single Board Computer that exposes a UART/serial interface. I have personally done this for many ARM and even RISC-V boards 😉
If any of the points listed above are interesting for you (which basically are “My Raspberry Pi does not boot and I can’t see why.”), follow along!
What is a serial adapter?
Simply put, a serial adapter is like your HDMI/DP cable. But instead of carrying data in form of video, it carries data in form of plaintext. This means that the drivers needed for serial interface initialisation are dead simple and can be loaded in without any dependencies (i.e., as early as possible in the boot flow).
📋
Choosing and purchasing serial adapter
Now that you know the function of a serial adapter, you might want one. And there are just as many choices for a serial adapter as there are Linux distributions! And just like Linux distributions, there are some that I prefer.
They are the serial adapters with the following chipsets:
- CP2102: This is my go-to chipset almost every time. You can get one from Amazon (affiliate link).
- FT232 series: Some boards use a baud rate (we will discuss “baud rate” later on in this article) of 1.5 million. The CP2102 maxes out at 921,600 bauds. In which case, CP2102 won’t work. Therefore using an adapter with this chipset is an excellent bet. You can get it from Amazon (affiliate link).
- Adafruit 954: This is a serial adapter to buy if you can digest the [comparatively] high price. It’s quite nice! (The 954 is just the Adafruit product ID.) Here’s the Amazon link (affiliate link).
- Raspberry Pi Debug Probe: This accessory from the Raspberry Pi foundation does not only provide a UART device (what we’re concerned with for the scope of this article), but also works with OpenOCD! If you know what the later means, you’re already salivating!
A serial adapter that uses either one of these chipsets will work fine with the Raspberry Pi. But if you are unsure, I recommend that you go with an adapter that uses the CP2102 chipset.
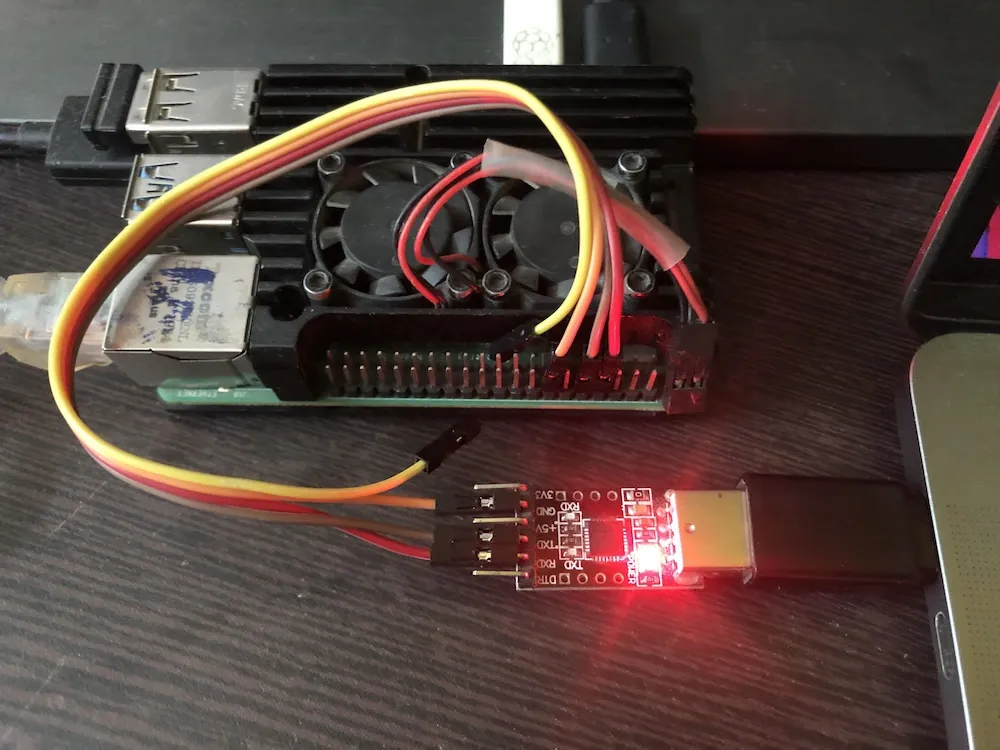
If you purchased a serial adapter with exposed pins (metal prongs) on one side (like in the image below), it is necessary that you purchase female to female jumper wires to connect the serial adapter to the Raspberry Pi’s GPIO pins! (We need only 3 such jumper wires.)

You can get these easily at any electronic shop or e-commerce sites like Amazon (affiliate link).

Preliminary setup
Before connecting these to your Raspberry Pi, you need to perform some preliminary setup.
Enable UART
🚧
Follow this specific step only if you are connecting to a Raspberry Pi. If not, please feel free to skip this step, as this is not something you need (or even have) to do for other SBCs/computers. 😉
The Raspberry Pi’s bootloader reads a file called config.txt before booting the Linux kernel. It is located in the /boot directory as /boot/config.txt. If you are on the Bookworm or later release of the Raspberry Pi OS, the config.txt file is located at /boot/firmware/config.txt.
This file is responsible for toggling UART on or off. For some reason, the default value for UART is set to off. I don’t know why this decision was taken, since turning it on has no negative impact (that I’m aware of)!
It is time to toggle this on. In your /boot/config.txt file, ensure that the enable_uart parameter’s value is set to 1 (enabled) and also that it is not commented out.
# before Bookworm release
$ sudo grep '^enable_uart=1' /boot/config.txt
enable_uart=1

# Bookworm and later releases
$ sudo grep '^enable_uart=1' /boot/firmware/config.txt
enable_uart=1
If, running either of the above commands does not result in any output, either
- The value for the
enable_uartparameter is set to0instead of1. - The line defining the value for the
enable_uartparameter is commented out. - The value for the
enable_uartparameter is not even defined.
In which case, append the following line at the end of the config.txt file:
enable_uart=1Install a serial communication program
There are many choices to using a program that enables serial communication. Of the many, a few of them are:
picocom: This is what I prefer.minicom: Most guides use this, so if you are new, usingminicommight be advantageous. Although I will be usingpicocomin this article since it is dead simple.screen: Some guides also mention this but I have never tried it.
Since neither of them is “new”, even the most stable/LTS distros like RHEL 7.x should have all three of them available in the first party repos. Simply use your package manager to install either one. I will be using picocom so install that please.
Attaching the serial adapter
Please follow the following steps in order:
💡
In case you face any difficulties, there is a troubleshooting section near the end. I recommend you go through it in such cases.
- Plug the USB end of the serial adapter into your computer/laptop.
- Get the serial device from the output of
sudo dmesg. (Check the troubleshooting section to find what the log entries might look like for you.) - Safely power down the Raspberry Pi.
- Using the GPIO pinout diagram below, attach the
- RX of adapter to TX of Raspberry Pi (pin 8 in diagram)
- TX of adapter to RX of Raspberry Pi (pin 9 in diagram)
- Ground of adapter to any ground pin on the Raspberry Pi (pin 14 in diagram)
- PLEASE MAKE SURE NOT TO CONNECT ANY 5v OR 3.3v PINS!
- Connect to the serial interface using the command:
picocom --quiet --baud 115200 <serial device>

picocom has now started listening to the serial adapter that you mentioned, but don’t worry if there is no output. The Raspberry Pi is powered off and therefore not communicating anything with your computer/laptop. It is time to power it on so we can see the boot logs from it.
💡
If you want to quit `picocom`, press `Ctrl + a` and then press `Ctrl + x`.
Following is a capture of booting Raspberry Pi OS on my Raspberry Pi 4B:
As you can see in the above recording of my terminal, the boot logs as the Linux kernel boots up are visible on my computer’s screen. These messages are typically what you might see in the output of the dmesg command.
But that’s not all. You can also interact with it! At the end, you might have noticed that I was at the getty (console login prompt). I could have logged in, but didn’t, to keep the recording short.
Sometimes when you are tinkering with the Linux kernel, it might panic and throw you in an initramfs shell so you can undo/fix anything that you consider potentially problematic. You can interact with that too, using this serial console!
Think of this as your keyboard directly connected to the Raspberry Pi but it outputs to your terminal’s screen 🙂
Troubleshooting
Q: My serial device does not show up.
There can be two reasons why this might happen:
- The serial adapter is not plugged in properly. In which case, make sure that the serial adapter has been plugged in properly. Avoid un-powered USB extension cables. Powered USB hubs are fine, by the way. Rely on the indicator LED on the adapter to know if it is plugged in properly or not.
- Drivers for the UART chipset aren’t found/loaded. In which case, check if the output of the
sudo dmesgcommand mentions the chipset of the serial adapter that you bought. Since I used an adapter with the CP2102 chipset, I have the following log entries in my kernel log:
$ sudo dmesg | grep 'cp210x'
[    9.485125] usbcore: registered new interface driver cp210x
[    9.486925] usbserial: USB Serial support registered for cp210x
[    9.488967] cp210x 2-1.1:1.0: cp210x converter detected
[    9.494169] usb 2-1.1: cp210x converter now attached to ttyUSB0

# yes, the chipset driver for the CP2102 chipset is called `cp210x`
Q: I get permission error with the picocom command.
This is an easy one to solve. Your user needs to be a part of the dialout group. Add your user to the dialout group, log-out then log back in. Make sure that you see dialout in the output after running the groups command. It should work now. This solution is only for Linux users.

Q: In picocom after powering board up, I don’t see anything.
There are several reasons for why this might happen:
- It might take up-to 5-10 seconds for the Raspberry Pi to start communicating via the serial interface. Please be patient.
- You connected RX to RX and TX to TX. Please refer to step 4. There I mention that it is a “cross” connection where the RX of one side goes to the TX of another side and vice-a-versa.
- If you followed step 4 as per my instructions, make sure that the jumper wires maintain a connection on both ends and either end isn’t loose or has come off while you were connecting.
- Make sure that
enable_uart=1is present/uncommented in the/boot/config.txtfile on the Raspberry Pi’s SD card. - If you’re still here, the SD card might be at fault. Try re-imaging and/or using a different SD card if possible.
- You are trying to boot an image that is intended for a different CPU ISA than what your board has. For example, you are trying to boot the x86 ISO of Fedora on an ARM Raspberry Pi or on a RISC-V computer. This will never work.

Q: I see some random garbage characters in picocom.
There are two reasons why this might happen:
- The baud rate is set incorrectly. Though the widely used baud rate for a lot of ARM and RISC-V boards is 115200 bauds, some boards use a baud rate of 1500000 bauds. Please refer to the board’s documentation for the baud rate that you should use.
- You didn’t follow step 4 correctly.
Conclusion
So here, I go over what a serial console even means, why it is used and is helpful. I also explained how to get a serial adapter and how to connect it to your Raspberry Pi (or any other Single Board Computer for that matter!).
I also mentioned some troubleshooting tips about problems I have encountered myself. That said, if you still have difficulties understanding things, please don’t hesitate to leave a comment and I’ll get back to you!
Let me know if you want similar how-tos by leaving a comment 😉