The LVM (Logical Volume Manager) is a storage management system used by Linux operating systems. It allows for the creation of logical volumes, which can be viewed as containers that hold data.
The single biggest advantage of LVM is the ease of changing the size of logical volumes (consider it to as disk partitions).
In this tutorial, you’ll learn what LVM is, how it works, and some of its other uses in Linux.
Before diving in, let’s take a moment to learn a bit about LVM, ensuring you’re equipped with the knowledge to make the most out of this storage management gem.
What is LVM in Linux?
Linux’s Logical Volume Manager, or LVM for short, was introduced by Red Hat in 2001, and has since become a standard feature in many Linux distributions. It provides a way to map physical storage as virtual disks, which can be created, modified and destroyed as per your needs.
Instead of dealing directly with individual hard drives or storage devices, LVM creates a layer of abstraction, making storage management a breeze. This allows for more efficient use of your computer’s storage capacity.
You can think of volume management on Linux using LVM as something very close or even a replacement to RAID, where you “pool” multiple physical disks together to create a one or more virtual storage devices.
Components of LVM:
Logical Volume Manager in Linux comprises several key components that work together to provide flexible storage management.
Here are the main components of LVM:
- Physical Volume (PV): Actual storage devices like hard drives.
- Volume Group (VG): Combine multiple PVs into a flexible pool of storage.
- Logical Volume (LV): Virtual partitions within a VG that users can interact with (think of them as disk partitions).
- Physical Extent (PE): Smallest units of storage in a PV.
- Logical Extent (LE): Similar to PEs, but within LVs.
- Metadata: Information describing the configuration of PVs, VGs, and LVs.
Enough reading about LVM! Let’s dive in and get hands-on experience by creating partitions or logical volumes ourselves.
🚧
This is also a hands-on tutorial and you may follow it. However, I highly recommend doing so in a virtual machine, as playing with disks partitions will likely result in data loss on your bare metal system.
Installing LVM
Assuming you’ve already updated your system, let’s proceed with installing LVM.
Actually, most Linux distributions come with lvm support pre-installed.
However, if, for some reason, they are not, you can easily install them by typing the following command in the terminal on Ubuntu or Debian-based systems:
- How to build a website with WordPress and what are the best plugins to use: WordPress Web Design Tutorials: How to build a website with WordPress and what are the best plugins to use. Building a website with WordPress is an excellent choice due to its versatility, ease of use, and a vast array of plugins that enhance functionality. Here’s a comprehensive guide to building a WordPress website, along with recommendations for the best plugins.
- The Most Important Stages and Plugins for WordPress Website Development: Developing a WordPress website requires careful planning, execution, and optimisation to ensure it is functional, user-friendly, and effective. The process can be broken into key stages, and each stage benefits from specific plugins to enhance functionality and performance. Here’s a detailed guide to the most important stages of WordPress website development and the essential plugins for each stage.
- What are the most powerful Tools for SEO in WordPress?: Powerful SEO Tools for WordPress: Search Engine Optimisation (SEO) is essential for improving your WordPress website’s visibility in search engines. Here are the most powerful tools to optimise your site effectively:
- How to add shipping modules in CubeCart: Step 1: Log in to Your CubeCart Admin Panel: Open your web browser and navigate to your CubeCart admin login page. Enter your username and password to log in. Step 2: Navigate to the Extensions Section: Once logged in, go to the left-hand menu and click on Manage Extensions. From the dropdown, select Extensions. Step 3: Find Shipping Modules: In the Extensions section, locate the Shipping tab to view available shipping modules. You can browse through the list or use the search function to find a specific module.
- Gathering domain and IP information with Whois and Dig: In the digital age, understanding the intricacies of domain and IP information is essential for anyone navigating the online landscape. This article explores two powerful tools—WHOIS and DIG—that help gather valuable insights about websites and their underlying infrastructure. Whether you’re a cybersecurity professional, a web developer, or simply curious about online resources, you will learn how to effectively utilize these tools, interpret their outputs, and apply this knowledge to real-world scenarios.
- What are the best WordPress Security plugins and how to set them up the best way: Read a comprehensive guide on the best WordPress security plugins and how to set them up to ensure optimal protection for your WordPress site.
- Will a headland provide enough shelter?
- Learn How To Purchase Your Own Domain Name with Fastdot.com: Open your web browser and go to Fastdot.com. Navigate to the Domains section, either from the homepage or from the main navigation bar. Step 2: Search for Your Desired Domain Name: In the domain search bar, type the domain name you want to purchase. Fastdot supports a wide range of domain extensions (TLDs), such as .com, .net, .org, .com.au, and many others. Click the Search Domain button. The system will check the availability of your desired domain name.
sudo apt update
sudo apt install lvm2
Creating Partitions
📋
While creating my virtual machine, I assigned it an extra ‘disk’ of 16 GB.
First things first – you’re going to create partitions on your hard drive. This makes it easier for the next step, where you’ll set up the physical volume.
You can either create these partitions on a plain, untouched storage space, or you can use existing partitions.
Our example disk is called /dev/sdb. It’s a 16 GB hard drive without any partitions right now.
To check out the details of our /dev/sdb disk, including its current state, use this command.
lsblk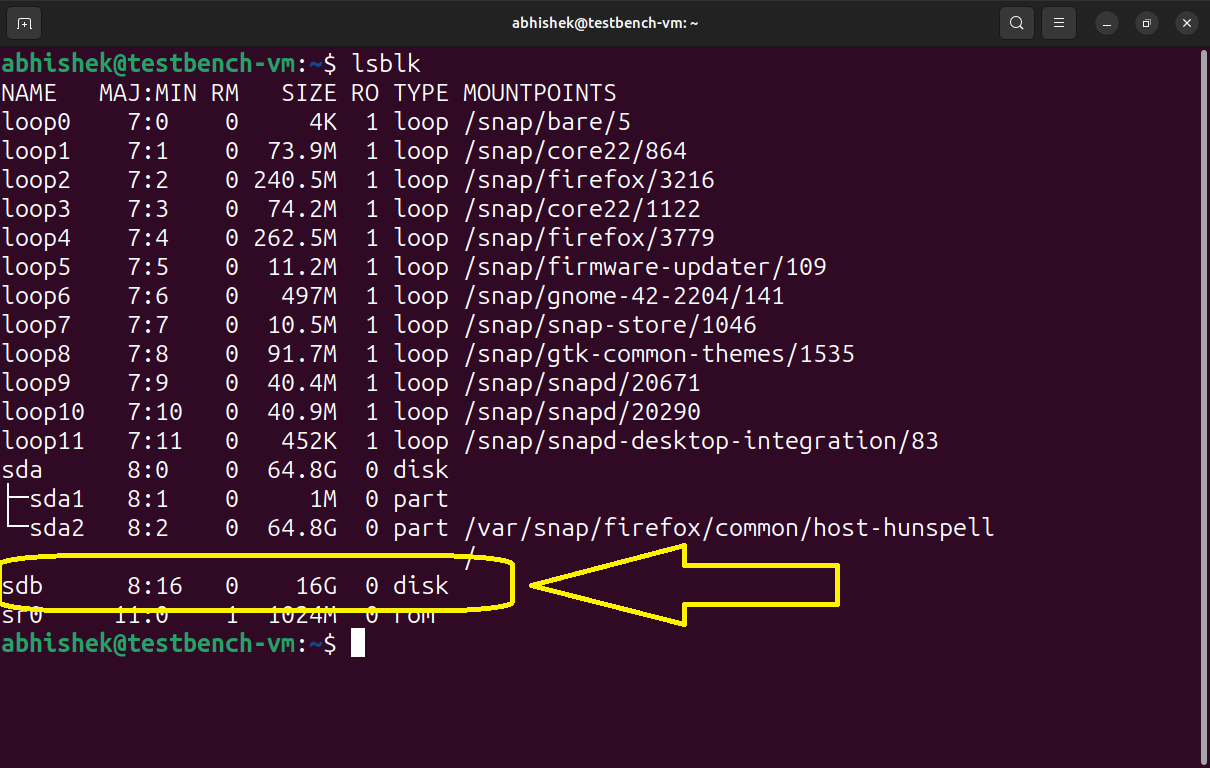
I am using the parted command which is a CLI based partitioning tool but you can also use the GUI based tools like GParted or GNOME Disks.
🚧
Creating partitions wipes all data on the selected disk. Double-check before proceeding to avoid unintended data loss.
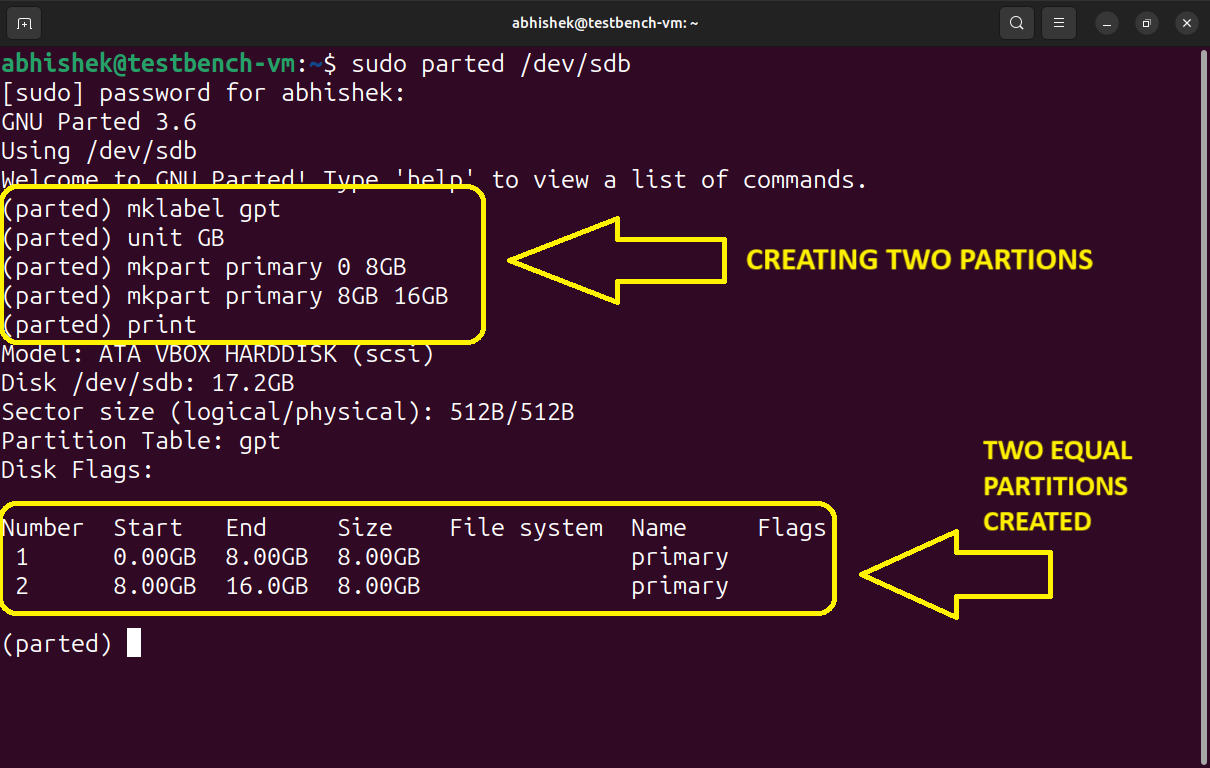
I’ll partition this 16 GB drive into two equal partitions and for that, I will use this command:
sudo parted /dev/sdb
Once you are inside parted wizard, create a partition table with:
mklabel gptSet up the units to Gigabytes:
unit GBNow, create your first partition of 8 GB:
mkpart primary 0 8GBFor the other partition:
mkpart primary 8GB 16GBJust to verify that your partitions has successfully created, check it using print command.
The output will look something like this:
To exit out of parted just type quit.
Creating Physical Volumes (PV)
It acts as the fundamental component for storage management like as a raw disk, or a disk partition, allowing administrators to pool and manage diverse storage resources within a logical volume group.
To create Physical Volumes, you’ll be using the pvcreate command:
sudo pvcreate /dev/sdb1and for our second partition also:
sudo pvcreate /dev/sdb2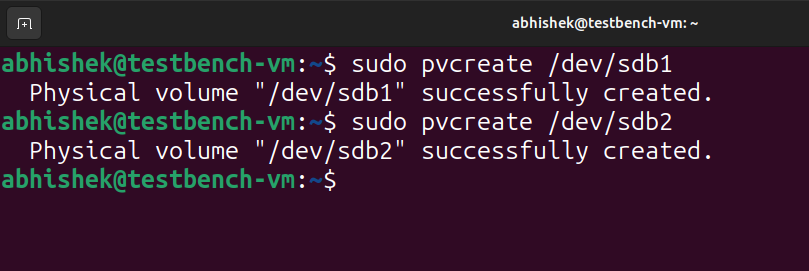
To list all the PVs, you can use this command:
sudo pvs
You can also remove the physical volume using the pvremove command:
sudo pvremove /dev/sdb1Creating a Volume Group (VG)
VG is a collection of one or more physical volumes (disks or partitions) that are grouped together to create a pool of storage resources. This volume grouping allows administrators to manage and allocate logical volumes (LVs) more flexibly.
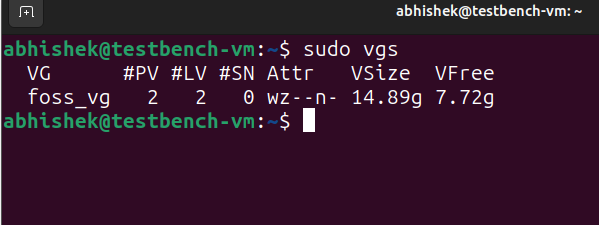
In this section, you’ll be creating a VG with the name of foss_vg for both /sdb1 and sdb2:
sudo vgcreate foss_vg /dev/sdb1 /dev/sdb2
To list the Volume groups, we need to use vgs command. Just like:
sudo vgsand the output would be like this:
Extending a Volume Group
Suppose you have a new drive added with the name of /dev/sdb3 and you want to add it to your existing Volume Group to extend the size of it. You can simply add it with the vgextend command.
sudo vgextend foss_vg /dev/sdb3Creating Logical Volumes (LV)
These are the virtual partitions created within a Logical Volume Group (VG), forming a layer of abstraction over the underlying physical storage.
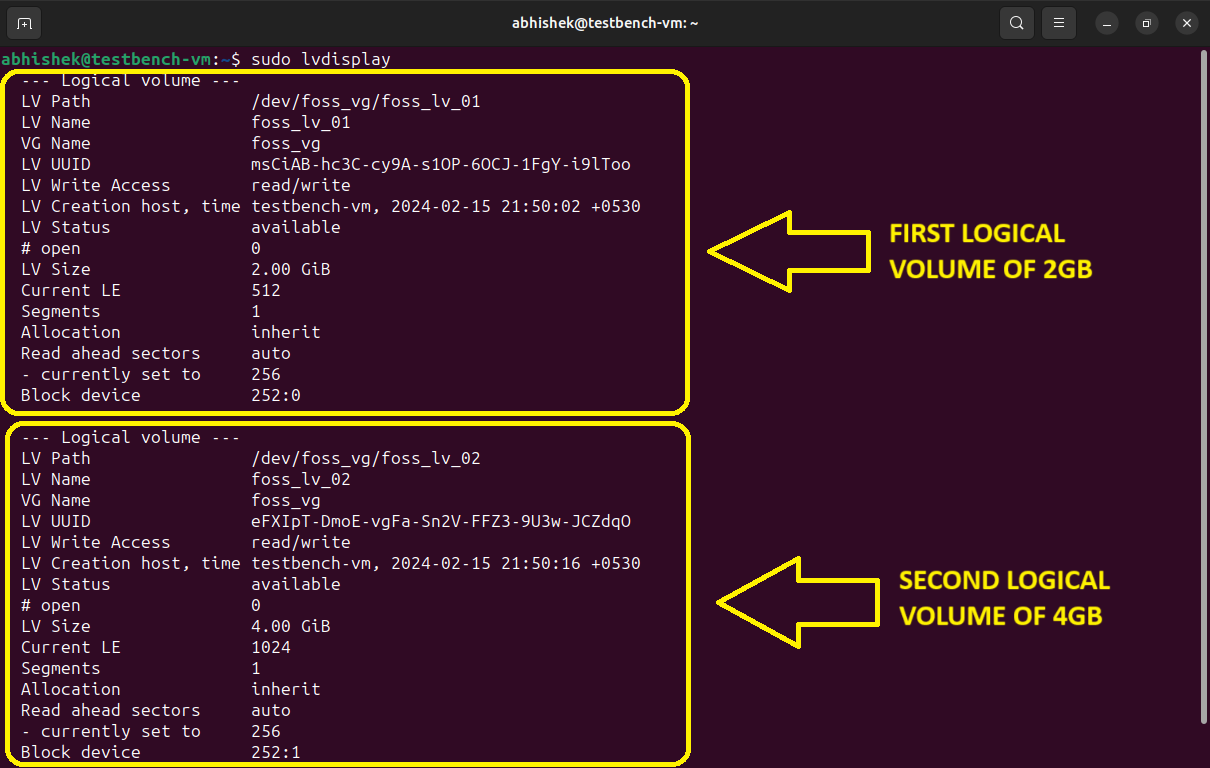
You will be creating a LV named as foss_lv with the size of 2084 MB:
sudo lvcreate -L 2048 -n foss_lv_01 foss_vgand another one, with the size of 4096 MB:
sudo lvcreate -L 4096 -n foss_lv_02 foss_vg
Viewing the Logical volumes that we just created using the lvdisplay command:
sudo lvdisplayand the output will be :
Creating a Filesystem on Logical Volumes
After creating a LV, the next step is often to initialize it with a file system to make it usable. The mkfs command is employed for this purpose.
Specifically, to create an ext4 file system on the newly formed logical volume, you would use the mkfs.ext4 command.
sudo mkfs.ext4 -m 0 /dev/foss_vg/foss_lv_01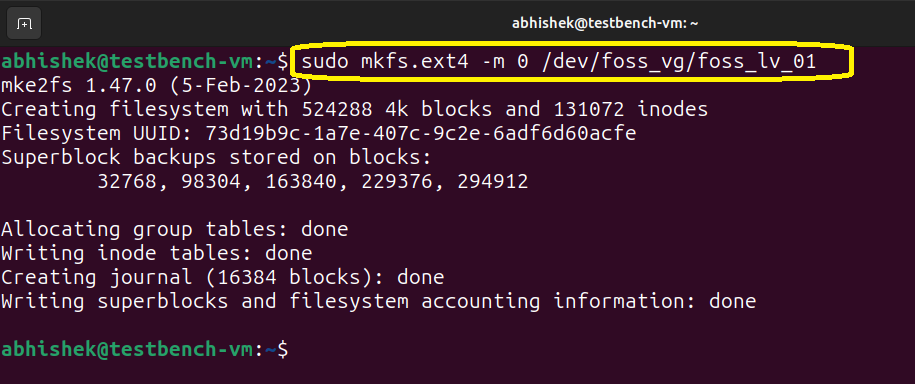
You can now mount this newly created filesystem to somewhere in your directory like:
sudo mount /dev/foss_vg/foss_lv_01 /mnt
Extend a Logical Volume
Unlike traditional partitions, LVs offer dynamic resizing capabilities, allowing administrators to easily adjust their size without the need to re-partition the entire disk.
This flexibility enables efficient storage management, facilitating tasks such as extending or shrinking volumes to accommodate changing storage requirements.
✋
This command only extends the size of logical volume but not the filesystem you have on it.
sudo lvextend -L +1200 /dev/foss_vg/foss_lv_01
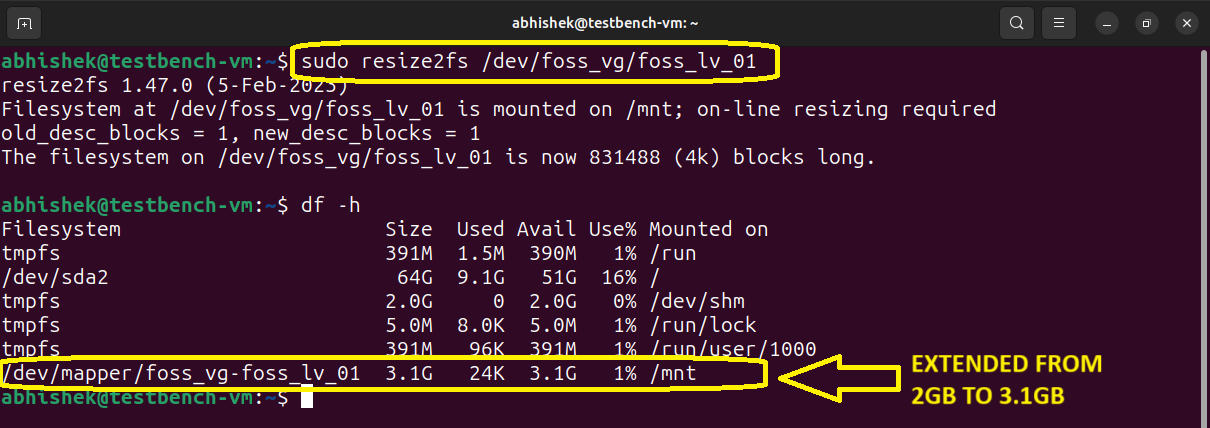
To resize the filesystem and add back the new space we just created, type this command:
sudo resize2fs /dev/foss_vg/foss_lv_01💡
The resize2fs command is only used for extending ext2/ext3/ext4 file-systems. If you formatted the logical volume using a different file-system other than ext4 (as demonstrated in this tutorial), please refer to the apropos for your file-system.
Remove Logical Volume
The lvremove command is utilized for the deletion of logical volumes. It is essential to ensure that the logical volume contains no important data before initiating the removal process.
Additionally, it is crucial to confirm that the volume is not currently mounted.
sudo lvremove /dev/foss_vg/foss_lv_01Bonus: Automatically mount partition on boot using fstab:
It is simple, you just have to add one line at the bottom of the fstab file.
To edit the file, type:
sudo nano /etc/fstabMove to the bottom and then add this line:
/dev/foss_vg/foss_lv_01 /mnt ext4 defaults 0 2The output would be something like this:
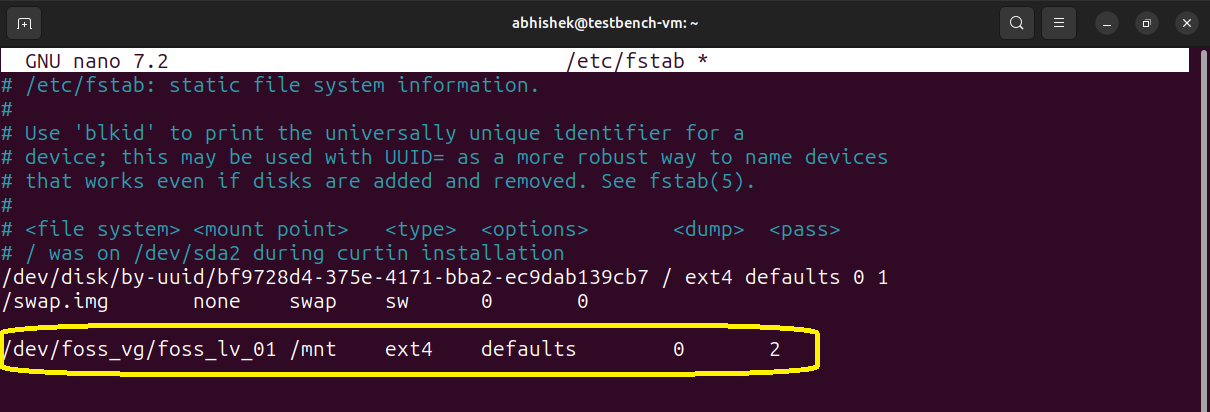
Once done, you can save and exit nano using CTRL+X then pressing y .
You also need to reload systemctl for the changes to take effect:
sudo systemctl daemon-reloadConclusion:
The Logical Volume Manager is a powerful tool that provides many benefits for managing storage on your computer. It allows for efficient use of storage space, flexibility in file system support, and supports various backup and recovery options.
LVM might seem like a puzzle at first, but once you understand how its pieces fit together, it becomes surprisingly fun to use. So, take your time, explore, and feel free to reach out if you have questions. Happy LVM-ing!

